Installing XtraBackup on CentOS 6.5 64-bit
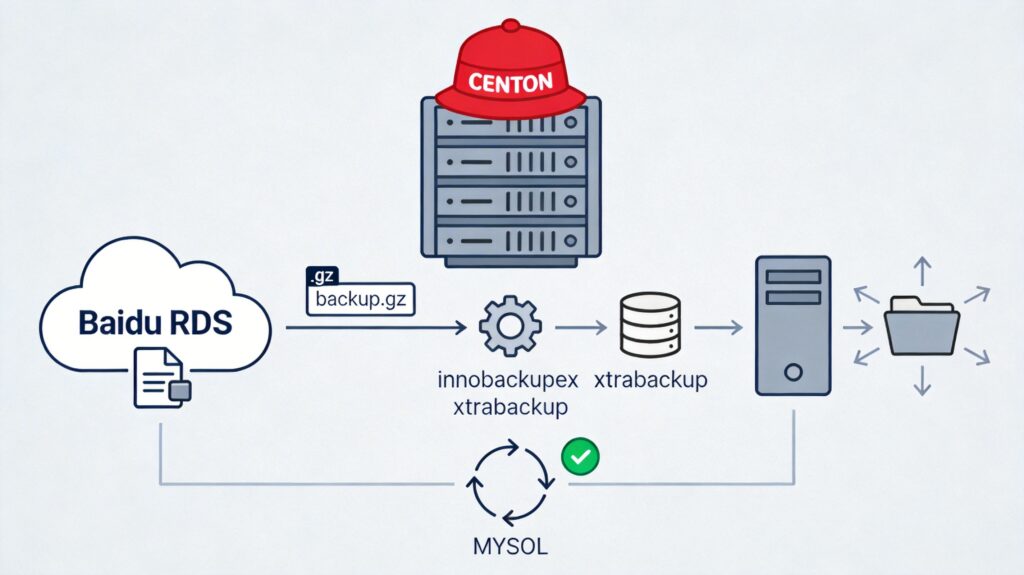
This guide details the process of restoring a Baidu Cloud RDS MySQL backup file (backup.gz) to a local MySQL server running on CentOS 6.5 64-bit. The first step is to install the Percona XtraBackup tool.
Download the appropriate RPM package from the Percona website for your system version. This example uses version 2.1.5:
wget https://www.percona.com/downloads/XtraBackup/XtraBackup-2.1.5/RPM/rhel6/x86_64/percona-xtrabackup-2.1.5-680.rhel6.x86_64.rpmInstall required dependencies:
yum install -y perl-DBD-MySQL perl-DBI perl-Time-HiRes libaio*Install the XtraBackup RPM package:
rpm -ivh percona-xtrabackup-2.1.5-680.rhel6.x86_64.rpmVerify the installation:
rpm -qa | grep xtrabackupExpected output:
percona-xtrabackup-2.1.5-680.rhel6.x86_64Check installed files:
rpm -ql percona-xtrabackup-2.1.5-680.rhel6.x86_64The output should include key tool paths like /usr/bin/innobackupex and /usr/bin/xtrabackup.
Step 1: Download and Extract the Backup File
Use wget to download the backup file (e.g., backup.gz) from the RDS console. Then, extract it using:
mkdir -p /home/mysql/data_dir && gzip -d -c backup.gz | xbstream -x -C /home/mysql/data_dirThis command will:
- Create the data directory
/home/mysql/data_dir. - Decompress the backup stream using
gzip -d -c. - Extract the decompressed stream to the specified directory using
xbstream -x.
Step 2: Apply Transaction Logs (Prepare)
After extraction, apply InnoDB redo logs to bring the data files to a consistent state. This is a critical recovery step.
Note: Some older tutorials may reference incorrect commands (e.g., innobackupex_55), causing a "command not found" error. The correct command is innobackupex.
Run the following command:
innobackupex --defaults-file=/home/mysql/data_dir/backup-my.cnf --apply-log /home/mysql/data_dirUpon successful execution, the terminal will output logs and finally display a message like "completed OK!".
Step 3: Configure MySQL and Start the Service
After preparation, adjust the local MySQL configuration based on the backup's settings.
- Edit the MySQL configuration file:
vi /etc/my.cnf- In the
[mysqld]section, comment out or modify the existingdatadirdirective and add the following key parameters. These values should be taken from the/home/mysql/data_dir/backup-my.cnffile, especiallyinnodb_log_file_size.
[mysqld]
# Point datadir to the extracted data directory
datadir=/home/mysql/data_dir
# The following parameters must match the backup's InnoDB system tablespace configuration
innodb_checksum_algorithm=innodb
innodb_log_checksum_algorithm=innodb
innodb_data_file_path=ibdata1:32M:autoextend
innodb_log_files_in_group=2
innodb_log_file_size=268435456
innodb_fast_checksum=0
innodb_page_size=16384
innodb_log_block_size=512
innodb_undo_tablespaces=0
Important: The value of innodb_log_file_size (256MB in this example) must match the setting from the original backup environment, or MySQL will fail to start.
- Restart the MySQL service to apply the new configuration:
/etc/init.d/mysql restartAfter restarting, connect using the MySQL client to verify the database has been successfully restored.
Summary and Key Considerations
- Command Variations: Commands may differ slightly between XtraBackup versions. This guide is based on version 2.1.x. Newer versions (e.g., 8.0) may have updated commands and options; refer to the official documentation.
- Configuration File: Ensure InnoDB parameters in
my.cnf, especiallyinnodb_log_file_size, match the source backup environment. - Permissions: Ensure the MySQL runtime user (typically
mysql) has full read/write permissions for the data directory/home/mysql/data_dir. - Version Compatibility: The XtraBackup version should be compatible with the MySQL major version of the backup file. Check the version support matrix before restoring.